>

Saturday, July 16, 2011

Smile Pugsley !


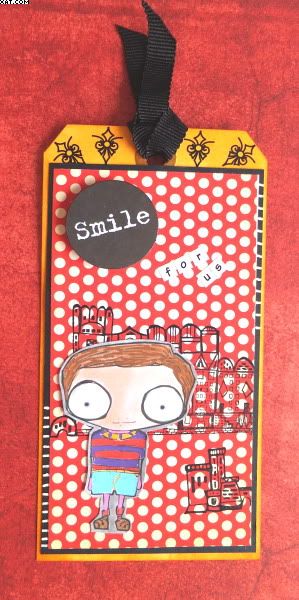
You must all remember Pugsley Addams ........... you know that little brother of Wednesday and the son of Gomez & Morticia.

Well, I have used a digital stamp of Pugsley by The Octopode Factory as the focus of this bright tag - don't you love those eyes which I have accented with Glossy Accents.  The image was trimmed out after printing and coloured with copics and Posca markers.


The tag base was coloured round the edges with spiced marmalade Distress ink. The spotty backing paper is also digital and a piece of this was trimmed and stamped with a couple of  Stewart Gill Artaglio stamps in archival black ink before being matted onto black card. Some black rub-ons were added at the top of the tag and the mat applied onto the tag with double sided tape.


A plate with the word 'smile' was applied on foam pads and the words 'for us added with self adhesive letters.  Pugsley was stuck in place with Glossy Accents as shown.


I then added some lines onto the black card with a white Posca and tied a piece of plain black grosgrain ribbon through the hole in the tag to finish.

Sid xx

Pin It

Friday, July 15, 2011

'Live' Box


Here is a box have I crafted using All Tim Holtz products and I think it fits the bill for this weeks Simon Says Stamp and Show Challenge which requires us to 'Show some Stitching - Faux or otherwise' & The Stamp Man Challenge 'Anything by T!m'. 

The stitching on my box is definately faux and I have made a sort of patchwork effect with 'Lost & Found' papers on the top.

I cut out roughly 9 squares of paper and after distressing the edges stuck them on the top of a 4 inch square box blank which was painted black with Adirondack acrylic paint dabber in pitch black. I used Matte Medium as an adhesive. When dry I distressed the edges with sandpaper.


The sides of the top of the box were covered with die-cuts using the TH 'on the edge' mini scallop and pinking die from more lost and found paper. These were stuck in place on all sides with matte medium and again distressed. All the distressed edges were coloured with aged mahogony Distress ink and foam. The sides were then treated with clear rock candy Distress Stickles and rubbed over with a finger.


I then used stamps from the TH 'Bitty Grunge' plate to add some images onto the top in archival black ink and some faux stitches were added on some edges of the patchwork squares with a black Posca pen.


All the embellishmnets were made from Grungeboard shapes and letters coloured with aged mahogony, dried marigold, faded denim and pine needles Distress inks on bases coloured with more black dabber.  The number 18 is a lost and found salvage sticker.  All were adhered with Glossy accents.


I was tempted to add more but I think that was enough.  This box would make great storage for cufflinks !

Sid xx

Pin It

Thursday, July 14, 2011

Wishing !


This tag is my entry into the UK Stampers Forum 'Vintage Choice' Competition. This competition has finished but if you like entering competitions then the forum has at least one each 2 months, they are free to enter and the prizes are donated by great sponsors. You will need to join the forum (Free also !) to enter.

 I started with a card blank and coloured it with cut'n'dry foam and Distress inks in victorian velvet and dried marigold.


The main stamped image is from Tuscan Rose and this, along with some swirls, was stamped in Versafine vintage sepia ink.  The flowers were originally white paper daisies and I coloured them with more victorian velvet and stamped with the swirl adding some gold Stickles glitter glue in the centres.

The lady's top was coloured in with some copic markers in lilac and some highlights were added with a flesh tone to her face. Gold Stickles was added to highlight her hair.  She was given a few lilac pearls as a necklace.


I chose two pieces of lace and layered these at the bottom of the tag again adding some lilac pearls on the cream piece.  Some edging was punched out with a Martha Stewart punch, coloured with victorian velvet, trimmed and adhered with glossy accents on the left.  The leaves are wooden and are coloured and edged with dark brown Copic. 


The metallic word plate was cut out and stuck in place and the flowers and leaves were adhered with glue dots.  Three more larger lilac pearls were added at the top of the tag and a piece of mustard silk ribbon tied through the hole to finish.

Sid xx

Pin It

Wednesday, July 13, 2011

'Will I Ever Get There?' postcard


Over on UK Stampers Forum one of the members has a monthly postcard swap, this months theme is Red, White & Blue and rather than go patriotic I have produced a Destination style card.  One of the stipulations is that it can be posted 'naked' to its recipient so needs to be robust enough to go through the post without damage etc.


The background is painted entirely with Dylusions matt acrylics in pink, white and turquoise, sprayed with home made blue mica spray (mini mister + 4 drops broken china Distress ink + 3 small scoops gold Perfect Pearls + water to fill half way).  I used some sequin waste and a sponge to apply white in places and an old credit card to add lines and a spray bottle lid to add circles.


The words stamp is from Indigo Blue (Grand Tour 1 plate) and was stamped in archival black ink.  The embellishments are: A ticket stencilled with fired brick Distress ink through sequin waste, a red arrow and two die cut corners (sizzix) made from dark red hand made paper.  These were applied with Studio matte medium.


The other lettering is made from small self-adhesive letters.  I used Posca pens in black, gold and white to highlight various elements.

Final touch was to coat the whole card front with more Studio matte medium to give it a resilient finish for posting.

Sid xx

Pin It

Monday, July 11, 2011

Text Background ATC's


This months swap theme for ATC's over on UK Stampers Forum is 'use some text as a background' so I made these three collage style ATC's as my offering.

The text backgrounds come from an old book featuring various styles of text over the centuries.  I simply tore out the page (did I say that?) and then adhered it to the ATC card blank and when dry trimmed round the ATC.

Each of the backgrounds were tinted with Distress inks and cut'n'dry foam, I used worn lipstick, old paper, walnut stain, aged mahogony and victorian velvet.


Various adhesions were used to decorate each ATC in the form of stickers, postage stamps, images, borders and plates.  I used the townscape TH 'on the edge' die to make a heavy acetate template and stencilled through it at the base of each ATC.


I used my trusty black Posca pen to outline some of the elements.  Just love those pens !!


The only stamping was with a small swirl stamp (?) and vintage sepia Versafine ink.  Each ATC was edged with Inka gold applied roughly with my finger and I definately could have been nicknamed 'Gold Finger' after that !

Sid xx

Pin It

Sunday, July 10, 2011

Vintage Style


Crafty Individuals have a challenge blog run by Jean Hardy and this months challenge centres on a colour theme of Pink, Cream and Brown so I thought I would have a go at a vintage style creation.


I started by cutting out a pre-printed pink and cream rose floral display as the main base.  This was edged in pink grapefruit Versamagic chalk ink and adhered onto a piece of brown linen textured card which was then matted further onto a piece of cream card cut at an angle.  All edges were inked with the same Versamagic ink.


The main central feature is made from a CI small collage frame which I painted first with french rose acrylic paint.  When dry this was liberally coated with cheap PVA glue and then overpainted with plenty of buttermilk acrylic paint.  I used a heat gun to immediately dry the paint to achieve the distress crackle effect.  This was enhanced with more of the pink grapefruit Versamagic.


I then cut a CI domino sized glossy printed image and attached it to the back of a Tattered Angels glimmer chip frame with Glossy Accents.  The frame was also coloured with the Versamagic and was then stuck in place within the collage frame.  Three flowers were punched from some brown and pink paper and attached at the bottom left of the frame and centred with pink half pearls.  A small piece of cream paper lace was added at the bottom of the frame.


Next I attached a piece of pink satin ribbon centrally over the base matts sticking with double sided tape.  I added a little plate with the words 'vintage style' stamped in Vintage Sepia Versafine ink on a piece of cream card. This was attached with foam pads as shown to the frame and the finished frame was adhered to the base with large Glue Dots.

Finishing touch was to add a Tattered Angels chipboard finial to the top with glossy accents.

Sid xx

Pin It

Saturday, July 09, 2011

Butterfly Twinchies


Twinchie time again !!  This time I have made 6 twinchies in the theme of 'Butterflies'.  The background is made from white heavy card painted in Dylusions acrylic paints in magenta & rose.  Overlaid with Americana acrylics in saffron yellow, warm white & antique white.  These were applied with an old credit card in layers until happy with the colours.  Final coat was with Lumiere hi-lite red to give it a red subtle iridescence which doesn't show very well on the photos.  Once dry the background was cut into six 2 x 2 inch squares.


Next I stamped some butterflies (7 Gypsies polymer) onto the twinchies with archival black ink and added a small rub-on flower to each as shown.


Next I used a green Posca pen and doodled some leafy swirls freehand onto the twinchies as shown.


 I then added some crystal ice, crystal & diamond Stickles on the wings of the butterflies and edged the twinchies with dark green chalk ink to complete.

Sid xx  

Pin It
Related Posts Plugin for WordPress, Blogger...