>

Friday, October 31, 2008

Autumn ATC's


These three ATC's are my interpretation of an Autumn theme as part of a swap with a friend in America who I have been swapping with for a good while now.

The first was stamped directly onto orange base card with Versafine vintage sepia. I used the leaves set from the See D's range. I then hand coloured the leaves in Autumn colours with Inktense watercolour ink pencils before applying Versamark Pen to selctive areas and heat embossing with a range of embossing powders - clear, tapestry, penny copper and gold. I edged the card with a fine line of gold Krylon.

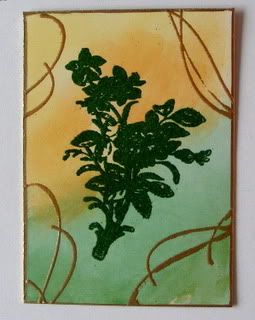
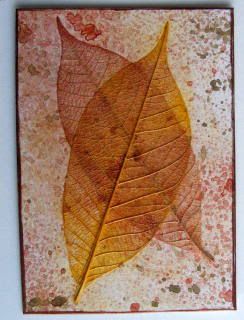
The second was made with two skeleton leaves which I coloured with Starburst Stains in yellow and brown before sticking to the plain white card with paper Mod Podge and allowing to dry. I gave them two coats. I then used various brown and green sprays from Sticky Fingers to colour the card and leaves. Finishing off with a copper spray and edging with dark brown Colorbox chalk ink.

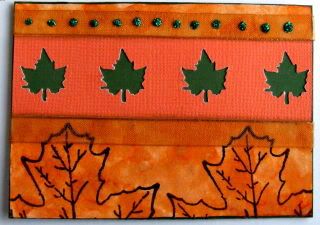
The third used white card as the base with three applications of marigold yellow orange Starburst Stains from a dabber. I allowed these to dry and then stamped a leaf See D's stamp in brown pigment ink and heat embossed with clear embossing powder. I then cut a strip of orange textured paper and punched leaves out of it at, mounting this over some green paper. This banner was then applied with glue to the top half of the card. Two lengths of chiffon ribbon were attached top and bottom of the leaf strip using double sided tape to adhere. The top ribbon was decorated with blobs of Stickles glitter glue in green. The edges of the card were finished with dark brown Colorbox chalk ink.

Hope you like them :-)

Pin It

Sunday, October 26, 2008

Sunday Challenge No 12


The UK Stampers Sunday Challenge set by Efemera this week is:

'The clock's ticking.................British summer time ends next Sunday 26th and the clocks go back 1 hour so get your skates on and create 2 ATCs with time as your theme, use the same stamp for both but a different technique for each!'

I used a clock stamp and the words Tick, Tock on my two cards.

The first one demonstrates a soot stamp-off technique. I first coated the card with a couple of coats of batchelor button blue Starburst Stain and allowed to dry. Then I lit a candle and held the coated surface (moving continuously) close to the flame, depositing soot over the surface and covering up the colour. I then used the stamps without any ink to remove the soot, leaving the coloured surface below to show through. I then sprayed the card with cheap hair lacquer to seal the soot onto the surface.

The second uses triple heat embossing and two colours of pearlised Deep Image Crystals UTEE from Once Upon A Stamp. The stamps were inked up with Brilliance mediterranean blue to act as a release.

Hope you like them :-)

Pin It

Saturday, October 25, 2008

Newest Stamps ATC's


Here are my three ATC's for the UK Stampers monthly swap for October. We were asked to used three of our newest stamps. I used various colours of Whispers dye inks to colour plain white cardstock using cut'n'dry foam. I then used three stamps from a set of 4 Dovecraft 'Laura Ashley' stamps to stamp centrally wirh Versamark ink. I then heat embossed with metallic powders. I then used three swirl stamps to embellish and again heat embossed with metallic and Moonglow EP's. I edged all three with Krylon gold pen.
Hope you like them :-)

Pin It

Tuesday, October 21, 2008

Halloween ATC

This is my entry into this weeks TMTA challenge (think Monday Think ATC), which was centred around Halloween. Simple plain orange card background coloured with Whispers dye inks in purple and blue and cut'n'dry foam. Overstamped with spiders webs, spiders, a swirl and the word 'B00.....00' in Versafine onyx black. The bodies of the spiders have been coloured with green pearlescent Lumiere acrylic paint and the whole card splashed with blue interference ink from Sticky Fingers. Edged with Colorbox chalk ink in purple.

Hope you like it :-)

Pin It

Sunday, October 19, 2008

Simple Card

This card has been made as a challenge set by Diane on her blog , one of our forum members. She is kindly giving away some blog candy to the lucky random winner and the challenge closes on Saturday 25th October 2008. The challenge required that a card was made using no more than two stamps, one embossing powder and one colour of ink with no printed backgrounds. I kept it very simple.

I used plain petrol blue card as the base and then stamped with Versamark ink using an All Night Media stamp (48362A) and heat embossed this with Moonglow desert moon turquoise embossing powder. I then trimmed this and matted the plate on some textured turquoise card which formed the base of the card. I then stamped a Clarice Cliff style stamp from Tanda stamps in onyx black Versafine ink on another square of turquoise textured card which was applied to the centre of the matt with foam pads. All edges were coloured with Colobox turquoise chalk ink.

That's it ! Hope you like it :-)

Pin It

Saturday, October 18, 2008

Sunday Challenge No 11

This is my UK Stampers Sunday Challenge No 11, whose theme was to use a store credit card as the base. I gave the card (WH Smith giftcard) a thick coat of randomly applied beige acrylic paint and allowed to dry. I followed this with a stripe of slate grey acrylic paint dragged over the surface with the edge of a piece of scrap card picking up the high spots of the previous coat of beige. I then brushed the background with gold calligraphy ink.

I then used an ISC stamp from the pear plate and stamped in iris Stazon directly over the background. I then used a See D's letter P stamp and again stamped top right with iris Stazon. I then threaded six round gold beads onto gold wire and bent over the ends to secure, bending the wire to form a corner. This was stuck in place with adhesive as shown. The edges of the card were finished with purple Colorbox chalk ink.

Hope you like it :-)

Pin It

Thursday, October 16, 2008

3 x 3 Inchie Swap No. 2


Well, finally finished my inchies for the UK Stampers 3 x 3 Inchie Swap No. 2. This months theme is 'Autumn' being the appropriate season for this. Enjoyed doing them though and have had a very crafty weekend and have done loads of projects.

I started with a 3 inch by 3 inch square of orange card and applied Adirondack inks in lettuce, raisin and butterscotch working well with cut'n'dry foam. I then stamped randomly with various leaf stamps from the See D's morsels lattice & vine set using Distress inks in mahogany, pine needles and dried marigold. I used a vine stamp and applied Versamark randomly and then heat embossed the vine impressions with penny copper EP.

The piece was then cut into 9 individual squares with the cutter. I used a Fiskars floral corner punch and cut out 18 orange and moss green leaves applying 2 to each square with glue stick. The inchies were then edged with dark brown Colorbox chalk ink.

Hope you like them :-)

Pin It

Wednesday, October 15, 2008

'DARK'

This months theme for the UK Art Raffle is 'Dark', to be interpreted any way we liked. This art has also been entered into the 'Goth Style' Wednesday Stamper challenge for this week.

I wanted to do a dark atmospheric number so I started with a yellow card as the base and applied Adirondack dye inks with cut'n'dry foam to obtain a murky overall background. I used bottle, denim, egglant and slate to get the effect I wanted, using small pieces of foam and picking up the ink after first applying ink to a non-stick craft sheet.

I had acquired, many moons ago (pun), a laser cut sheet of tree silhouettes and I cut one of these out and sprayed with Moon Glow Glitz Spritz in desert moon wild iris, allowing to dry naturally before edging with silver Krylon to reflect the moons silvery glow. This was set aside. I then stamped the base with a foliage stamp (anon) in Brilliance pearlescent lime.

The devils face was a stamp I have never used before and came from a grab bag from Third Coast rubber stamps in the USA. I stamped this several times in Versafine onyx black to go behind the tree. The stars in the sky were stamped with a dotty stamp (anon) with Brilliance mediterranean blue and the moon was applied top right with silver Krylon and a circle stencil. The bird was stamped onto black/silver card with black ink and cut out before edging wings, beak and tail with silver Krylon. The word 'DARK' was stamped with magnetic stamps from Making Memories and onyx black Versafine.

The tree was applied over the devils faces with glue stick and the bird applied with silicone glue as shown. The scene was matted onto black and green carstock to finish.

Don't think 'I' would like to walk past that tree on a night like that !!! Hope whoever is the lucky winner this month is not put off by my rather macabre art.

Hope you like it :-)

Pin It

Monday, October 13, 2008

'Ophelia'

A bit earlier this week with the TMTA Challenge for a change. I think that some of the contributors must be up at dawn on Monday mornings making ATC's to be the first to enter !!!!

This weeks theme is 'Ophelia' so I wanted to do something a little stylised and depicting the glorious figure of the lady of Shakespeare's Hamlet fame and fortune.

I took some plain white card and embossed with a swirl Cuttlebug embossing folder. This was then wiped over with the Versafine onyx black inkpad to ink only the relief swirls on the card. I then cut this to ATC size. I then used a stamp from the Majestic Women plate from ISC and stamped on pastel pink tissue in Versafine onyx black. When thoroughly dry I applied this over the inked ATC with lots of ModPodge paper medium and ensured that the tissue was firmly pushed down over the relief before allowing to dry.

The background swirls did show through but in a muted way and obscured the image of the girl with the flowing hair. I used a water brush and inks to colour the face, lips and eyes of the girl and highlighted the swirls in the girls hair with dark brown pen to accentuate the hair.

Then I took some paper flowers and adhered with glue as shown and highlighted the centres with dimensional pearl paint in silver. The word 'Hamlet' was stamped as shown with magnetic stamps from Making Memories and onyz black ink.

Pastel pink Colorbox chalk ink was applied around the edge of the card to finish. I thought the overall effect was subtle and had depth.

Hope you like it :-)

Pin It

Wednesday Stamper

This weeks Wednesday Stamper challenge is 'Brown Combo'. I made my own background card by spraying textured green cardstock with Moon glow Glitz spritz royal emerald fire, Glimmer Mist spring mint and Sticky fingers grass green spray inks. I allowed these to dry naturally to produce a rich opalescent sheen.

I then took a corner stamp with a lady on it and stamped this on pale green card in Versafine vintage sepia, tearing around the edges and edging with dark brown Colorbox chalk ink. I used a dotty stamp to stamp the top right corner of the base card and the torn out image with the same brown chalk ink. I then stamped two more single ladies face images on light green cardstock in Versafine olympia green, wiped over them with sage green chalk ink and edged them with dark brown chalk ink.

I then layered one of the images over the original sepia corner and attached with foam pads for relief. The sepia corner was also added as shown with foam pads. A strip of printed paper was adhered along the width of the card at the bottom and the second ladies face attached over this on foam pads.

Two epoxy stickers were added and some flourishes stamped on with gold Marvy Metallics to finish. I seem to be going a bit green at the moment but, along with blue, it is my favourite colour after all.

Hope you like it :-)

Pin It

Sunday, October 12, 2008

Mother Nature

This is my entry for the TMTA (Think Monday, Think ATC) challenge which this week is entitled 'Mother Nature' and which I am rather late in submitting.

I first prepared the background on white card using Distress inks in shabby shutters and pine needles blended in with cut'n'dry foam and spritzed lightly with water, blotting off excess water with tissue. I then stamped onto acetate with a bramble leaf stamp (anon), several times in Stazon ink in olive green, mustard, pumpkin and eden green overlapping to produce a pleasing effect. The acetate was trimmed to size and fixed, stamped side down, over the ATC background with 4 square copper brads to finish allowing the background to show through.

I wanted to produce a dreamy effect incorporating the glorious colours of Autumn as one of Mother natures astounding annual feats.

Hope you like the effect :-)

Pin It

Saturday, October 11, 2008

Buildings/Architecture 6x6 page

This weeks Sunday Challenge by Efemera on UK Stampers Forum is 'Architecture/Buildings' so I decided to make a 6inch x 6inch page using one main stamp from Zettiology (29-143-J).

I stamped this onto plain white cardstock with Versafine onyx black ink. I then trimmed to size and applied layers of Distress Inks with cut'n'dry foam in broken china, milled lavender and tattered rose, graduating to form a sky effect. I then used Marvey LaPlume 2 pens in rose pink and mauve to highlight various sections of the buildings. I then applied a Versamark pen (fine end) and picked out sections of the buildings and heat embossed these with fine detail clear embossing powder. The plaque was finished with a Klimt swirl corner stamp from Tanda Stamps stamped twice in the blue area of the sky to give the impression of clouds using Whispers azure seas dye ink.

The completed plate was matted onto pink and then blue cardstock and edged with blue iris Colorbox chalk ink.

Plain and quite simple, but I liked the way it turned out.........hope you do too! :-)

Pin It

Monday, October 06, 2008

Floral ATC's


Here are my three ATC's for a lady across the pond. The theme this month is floral and I have accomplished this by using some ready made fabric flowers as embellishments. The backgrounds on the pink and blue ATC's have been made by blending dye inks in various colours and the pink one has black spatters from a wet brush loaded with black acrylic paint. Some floral stamps have been used in red Stazon and silver pigment ink and one has a fragment of old bookpage added at the bottom. The leafy ATC was made using Lavinia clear stamps and adirondack inks embellished with dots of crystal Stickles glitter glue.

Hope you like them :-)

Pin It

Sunday, October 05, 2008

Structure ATC

Here is an ATC done for this weeks Wednesday Stamper challenge. I thought hard and long about this one. The theme this week was 'Structure'

I decided that I wanted to go natural, so I chose some natural sisal webbing dyed blue as the background. This was adhered to a white base card with glossy accents. I then used some real bark fibres for the bottom left hand corner which I stamped with letter stamps in black Stazon before overlaying on the webbing as shown. I heat embossed some loose pearlised blue EP in an irregular stripe half way up the card and applied some iridescent lilac seed beads to the top right again with glossy accents. The card was finished by edging with dark blue colorbox chalk ink.

I liked the texture which provide some structure too. Hope you like it too :-)

Pin It

Saturday, October 04, 2008

'Bling'

This is my entry for this weeks UK Stampers Sunday Challenge No.9. I wanted to really go very glittery and glitzy so I started with stamping a Lost Coast Designs large clown doll rubber stamp which was stamped with onxz black Versfine ink onto plain white copier paper. This was then coloured in with Inktense ink pencils and a waterbrush. I wanted the wings to be a bit parrot like in colour. When done I cut out the image with a pair of decoupage scissors and set aside.

I took some hammered lilac base card and sprayed this with Glimmer Mists in passion red and periwinkle, fairly heavily and allowed this to dry naturally to avoid curling. When dry I overstamped the card with Versamark ink and a Dovecraft Laura Ashley design stamp which was heat embossed with violet pearl iridescent embossing powder.

I then stuck the large clown doll image centrally on the background card and decorated this with a variety of glitter gels. The plinth was enhanced with Krylon gold pen. Three flat backed cabouchons were added to the clown hat and two small red cabouchons added to the cheeks of the face. The 4 corners of the background were then adorned with tiny lilac seed beads held in place by glossy accents. The whole piece was matted over a slightly larger sheet of red glitter card and a vellum tag with the word 'Bling' spelled out with clear dimensional self adhesive epoxy letters. The thread was coloured violet with permanent ink and attached with a metallic violet mini peg.

Very glitzy and glittery, but very difficult to photograph too. In real life it is positively 'BLING'.

Hope you like it :-)

Pin It

Friday, October 03, 2008

Art Doll Charm

This is my little (3 inches tall) Art Charm Doll done for a swap on UK Stampers Forum. Pinky is running the swap and I have just finished mine.

I printed a doll parts template from the internet onto plain copier paper and then stuck this to a large sheet of black shrink plastic with glue pen. I then cut around the parts and soaked off the template paper with warm water, leaving me with all the bits. I then punched holes in the appropriate places with the crop-o-dile so I could assemble the doll when finished.

I decided to use Opalite inkpads in crystal blush for the arms and glacier blue for the legs. The stamps are two of my unknowns......but I thought they would give a decorative pattern when shrunk down. The torso was sprayed with starburst stains to achieve a mottled, shiny appearance. All parts were shrunk carefully with a heat gun and flattened whilst still hot with an acrylic block until cool. I only decorated one side of the doll with these. I painted the rear of the doll with blue matt acrylic paint and sprayed with fixative. All body parts were edged with gold Krylon pen.

For the skirt I used silver header pins and threaded numerous blue beads and just bent over the ends roughly with pliers to hold the beads onto the header pins. I then cut a length of fine black wire and threaded this through the two leg holes on the torso and threaded the beaded header pins onto this before securing at the front by twisting neatly at the rear of the doll. I then applied dabs of gold krylon on the torso as shown. All parts were attached with silver jump rings so the legs, arms and head were articulated.

The picture of the vintage ladies face was stuck to the head with glossy accents and a malachite star stuck on with glossy accents.

The silver lobster claw clasp was attached to the head with another header pin for hanging purposes.

This is the first of its type that I have made and I don't think it is very serviceable really. I found it a bit tricky but was quite pleased with the results though and it has given me more ideas for future pieces.

Pin It

Wednesday, October 01, 2008

Halloween Invite


I was asked by a friend to do 20 Halloween party invites for the forthcoming celebrations on 31st October. One of the cards is featured above.

I took some maroon cardstock and made the card blanks to a size of 5in x 5in. I then took some orange whitecore card and cut this into smaller squares to be matted onto the fronts of the cards. I then used one of my new cuttlebug embossing folders (Cobweb) to emboss these. Once embossed a Whispers black dye inkpad was lightly rubbed over the embossed surface to accentuate the web design I then sprayed lightly with Sticky Fingers silver shake-n-spray to give the webs a bit of glitz. When dry the matts were adhered to the front of the cards and a 2 inch piece of silver cord was cut and stuck onto the web with one end at the centre of the web.

I searched high and low for some spiders to adorn the webs and finally found some in a £1 shop. I adhered a spider with a glue dot at the other end of the thread.

Some plaques were made with the same card and these were stamped with a 'You Are Invited' stamp from See D's celebrations set. The plaques were then applied on foam pads to add relief.

The card inserts were printed on the inkjet printer and applied inside the cards. Maroon envelopes finish the project.

Hope you like them :)

Pin It
Related Posts Plugin for WordPress, Blogger...