>

Saturday, May 31, 2008

Double Altered Slide Mailer


Here is a slide mailer I have recently done as a swap on UK Stampers Forum

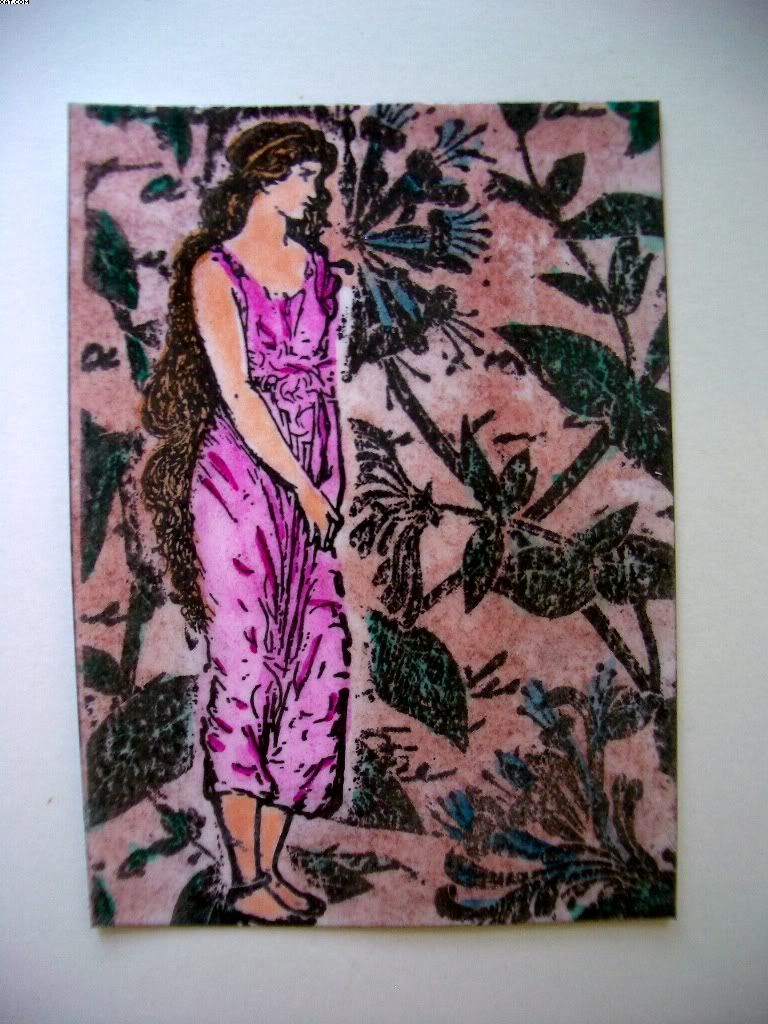
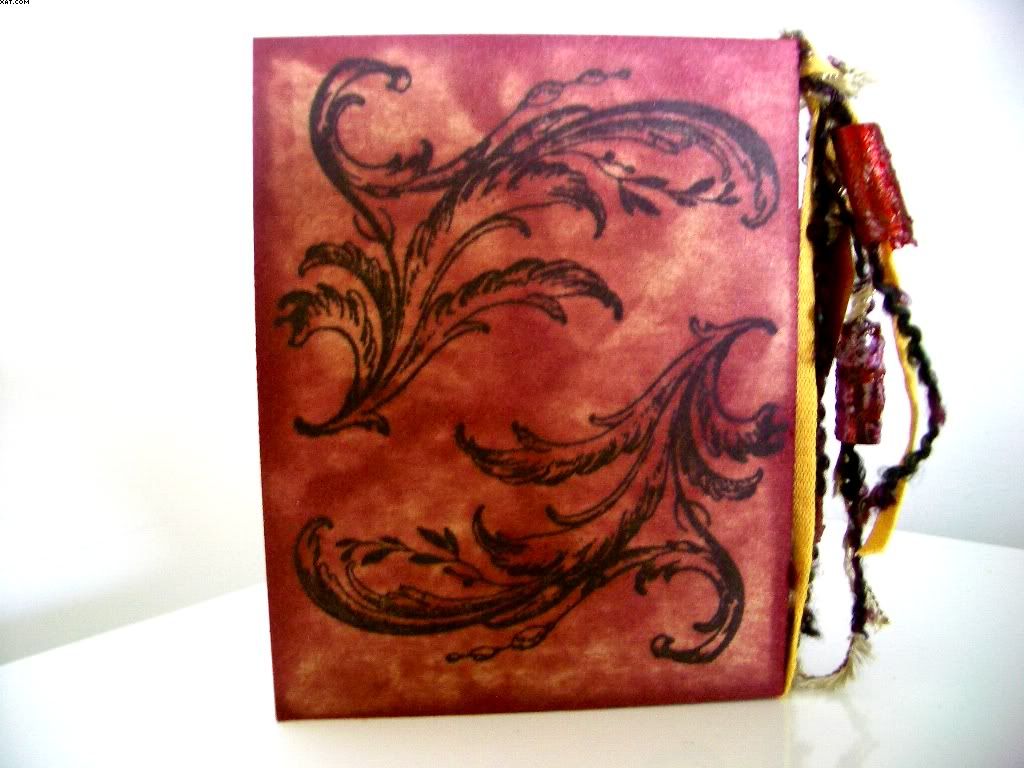
I have used a number of stamps to complete the project, a couple of flourishes, a 4 face stamp, a pensive lady, eyes stamps and a couple of sentiments ( follow your heart & discover). All have been stamped in black stazon except the discover sentiment which is in sepia Versafine ink. The background colour was made by direct to paper technique using a dark brown Whispers dye inkpad. Some hand colouring was done to enhance the black outline stamped images. The slides were done by backing them with the stamped eyes images given a spray with iridescent pink spray before attaching to the back of the slide with adhesive metal tape which was scraped with a piercing tool to provide texture.
Finally, the fibres were added and a tag with my details. Some of the fibres were embellished with hand made plastic beads.
Hope you like it !!

Pin It

Thursday, May 29, 2008

Chrysanthemum Birthday Card

This is another Laura Ashley-esque creation done on a plain mauve DL background card. A Dovecraft stamp of a Chrysanthemum was inked with Olympic Green Versafine and stamped twice each time to produce the stamped background. Certain flower centres were picked out in purple gellyroll glitter pen to add a sparkle. One of the 12 inch papers by dovecraft was then cut into squares and these were edged with orange chalk ink before being placed on the card using 1mm foam pads to raise the images. The sentiment plate from See Dees was stamped on dark green cardstock with Versamark ink and this was heat embossed with gold embossing powder. Two sides of the plate were lined with gold Krylon pen before adhesring it to the card with foam pads.

Thought the dimensional look was good and hope you like it.

Pin It

Wednesday, May 28, 2008

Quotations ATC Set


These three ATC's were done as a swap on UK Stampers Forum
The backgrounds were first brayered with various colours of Whispers Dye Inks until a colour density was attained. A swirl stamp was used to decorate each ATC with Versamark and various Moonglow embossing powders which were heated with a heat tool. The diamond check was stamped in onyx black Versafine Ink in various positions. Finally some K&Co quotes were inked direct to paper and adhered with glue. Some dimensional paint blobs were added to the corners of each of the quotes to finish.
Hope you like them !

Pin It

Tuesday, May 27, 2008

Another Floral ATC Set


Here are another 3 ATC's this time for a swap with a lady called Sandy from Winsconsin USA. These were done using more Laura Ashley backing papers, USArtquest watercolour paints applied by waterbrush and some brads and buttons. The middle ATC has a background in wisteria and denim blue chalk inks applied direct to paper over a Versamark stamped image which was first heat embossed with clear embossing powder. Once the colour had been applied to my liking I have placed the ATC face down and sandwiched between two sheets of brown paper. This was then dry ironed with a hot iron to melt the EP and absorb it into the brown paper. This produced a faux batik effect which allowed the white base card to show through the image. The words were stamped with Making Memories magnetic stamps and Versafine ink.


Hope you like them !

Pin It

Sunday, May 25, 2008

Laura Ashley Card

Just a quick card made with one of the Dovecraft Laura Ashley papers. The card is a 5 x 5 inch pearl lattice with a 4.5 x 4.5 inch square of the paper applied. I have cut out and decoupaged one of the Chrysanthemum motifs and applied fine glitter in multi copper with a Quickie glue pen and added a piece of self adhesive ribbon in lime. The sentiment was stamped with a See D stamp and Versafine vintage sepia ink.

Simple and quick.........hope you like it.

Pin It

Friday, May 23, 2008

Floral ATC Set


Here is a set of 3 'Floral' ATC I have done as a swap with an Australian Lady who suggested the theme. I have used Whispers dye ink pads in various colours to make the backgrounds direct to paper. I have used a flower stamp from Third Coast as the main theme and a leafy flourish stamp to embellish. Inks used are Versafine onyx black and vintage sepia. The flower image has been painted with waterbrush and US Artquest Jewelz Interference Green, Blue & Yellow watercolours and the flourish accented with blobs of dimensional paint in peacock blue.
As usual these do not show well in the photos but they look rather nice in the light and when viewed at an angle. Hope you like them as they wing their way to Australia.

Pin It

Wednesday, May 21, 2008

Triangulation?

Here are yet another two triangular ATC's. These have a shiny clear embossed coating which enhances the vibrancy of the colours used. All used Distress Inks and various rubber stamps to achieve the effect. A waterbrush was used to spread areas of colour. The one on the right was an experiment with some other inks I have to see if they stood up to heat embossing........looks a bit Xmassy to me !!!! Once again I hope you like them.

Pin It

Tuesday, May 20, 2008

Treasure Tag


Wanted to do another tag so I cut this one out of plain white cardstock on my Cricut. I first coloured the background using Adirondack inks in Espresso & Lettuce applied with Cut'n'Dry foam.

Then I stamped a flourish stamp in Lettuce Adirondack bottom left and a numbers stamp (don't know who from !) across the top, down the right side and across the bottom of the tag. I then stamped the same flourish in Palette metallic copper, but offset. The word 'Treasure' was then stamped in Espresso Adirondack.

The edges of the tag were coloured with Colorbox chalk ink in moss green and a length of assorted fibres in complimentary colours were added through the hole in the tag to finish.

The colours are subtle and relaxed and I do hope you like it.

Pin It

Monday, May 19, 2008

Going Triangular

Well I told you I would do more ! and I did just that.

Here are another two triangular ATC's I just completed. They use Judikins rubber stamps from an old cube stamp ' Soul Windows #1'. Click on the image to see an enlarged view.

Two images were stamped on plain white cardstock in onyx black Versafine Ink and masked and both were then coloured using a fine brush using colours from a set of Cosmic Shimmer mica powders. A very small amount of pigmented mica powder was placed in a palette with a couple of drops of water, mixed and used as a paint. These micas have an added binder so they don't need setting after applying. I heat dried the colours after each application. As usual the sheen and shimmer of the finish is lost in the photography.........but I can assure you it is actually there and looks great.

Hope you like these 'cause there will be more.

Pin It

Sunday, May 18, 2008

Triangular ATC


Inspired by a crafters blog by Dan99 ........ thanks Dan for the inspiration !!! I made my first triangular ATC today. I used two rubber stamps, the angel from Crafty Individuals and the Rouge et Noir sheet music from Purple Onion Designs . Both were stamped onto plain white card in onyz black Versafine Ink. The angel was stamped first and then masked before stamping with the sheet music.

I then used Distress Inks in spiced marmalade and worn lipstick applied with cut'n'dry foam. The angel was coloured using a waterbrush and my beloved Inktense water soluble ink pencils. The wings were highlighted with a Pentel gold metallic brush marker. The edges of the ATC were finished with onyx black.

Quite like the effect, but still need to try a lot more. Because one is never enough, of course, this one will certainly not be the last. Hope you like it !

Pin It

Saturday, May 17, 2008

Goddess ATC's


These two ATC's were made using rubber stamps and Versafine onyx black which were stamped onto the white ATC blanks using masks. The stamps are all of unknown origin. I have used Inktense watercolour pencils and a waterbrush to hand colour them along with some gold applied by fine brush. The finished ATC's have been heat embossed with one coat of clear detail embossing powder to give more intensity to the colours.

Pin It

Tuesday, May 13, 2008

Au Naturelle Card


The natural colour scheme of this card is again simple but effective.


Whilst on the subject of seedheads, here is another card made using the Lavinia companion stamp to the other two used on my last post. This time stamped on a piece of pearl paper with vintage sepia Versafine ink ( two impressions from one inking). The image was trimmed and matted first onto gold mirri card and then onto dark brown embossed pattern card allowing a 1/4 inch each time. The whole mat was then sprayed with a fine mist of glory of the seas gold Starburst Stains and force dried with the heat gun. This gave a golden shimmer to the image and mats. Finally stickles glitter glue in halo gold was added for a sparkle. The beige base card was folded to C6 size and multiple stamped down one side with a dotty Beachbum stamp in vintage sepia Versafine. The mat was adhered with double sided tape and a With Love plate attached with foam pads and the card was complete.

Pin It

Sunday, May 11, 2008

Seedhead Birthday Card


Now here is a simply but effective card. Take a plain lavender DL card and using a brayer apply a layer of eggplant Adirondack ink to the lower half of the card working towards you. Using the very edge of the brayer apply a thin stripe of bottle Adirondack at the top edge of the eggplant stripe. I used two clear Lavinia stamps of seedheads which were inked with black onyx Versafine ink. I highlighted areas of the stamped images with stickles glitter glue in holo gold. The card was finished off with the sentiment ' thinking of you on your special day....' from a set of celebrations SeeDee stamps.

Pin It

Bird Card


Inspired by some stamps I bought recently, dicky birds seem to have taken me by storm, just love the trend on birds at the moment.


This card was made by stamping a solid rubber bird image with vintage sepia Versafine ink, masking and then overstamping with a text stamp in black onyx Versafine on plain copier paper. The images were trimmed to size and edged with green chalk ink. The words 'Song Bird' were rubber stamped over the bird with chalk ink in emerald green. This completed the panel.


The tag was a clear green epoxy sticker which I stuck to a piece of gold mirri card which had been stamped with the word 'Soar' in black Stazon ink. The tag was trimmed around its edge, a hole punched with my cropodile and a short piece of dark brown organza ribbon tied through the hole. This completed the tag.


The eggs were stamped on white shrink plastic with dove grey Stazon, cut out and shrunk with a heat gun.


The background card was made with cream card and cut/folded to C6 size. A piece of decorative printed paper was adhered to the front of the card and trimmed. The edges distressed with the edge of a pair of scissors before applying old paper Distress Ink direct to paper. This muted the floral design a little. The ink was worked into the edges also.


The card was then assembled. The bird panel was stuck in place with double sided adhesive. The tag was positioned and adhered with glossy accents. The words 'Good Egg' were stamped direct to the card in onyz black Versafine and the eggs applied with glossy accents.

Pin It
Related Posts Plugin for WordPress, Blogger...